Creating Tasks via Dashboard
Learn how to create, configure, and deploy Tasks using the Rightbrain dashboard. This guide walks you through the visual interface designed for non-technical users to build AI-powered tasks without writing code.
No coding required. The Rightbrain dashboard provides an intuitive interface for creating Tasks with AI assistance at every step.
Overview of the Task Creation Process
Creating a task involves three quick steps:
1. Prompts
Define what your task should do using natural language instructions. Use clear, direct language so the AI understands the task’s goal and context.
Step 1: Define Your Prompts
Navigate to Create Task and start in the Prompts tab.
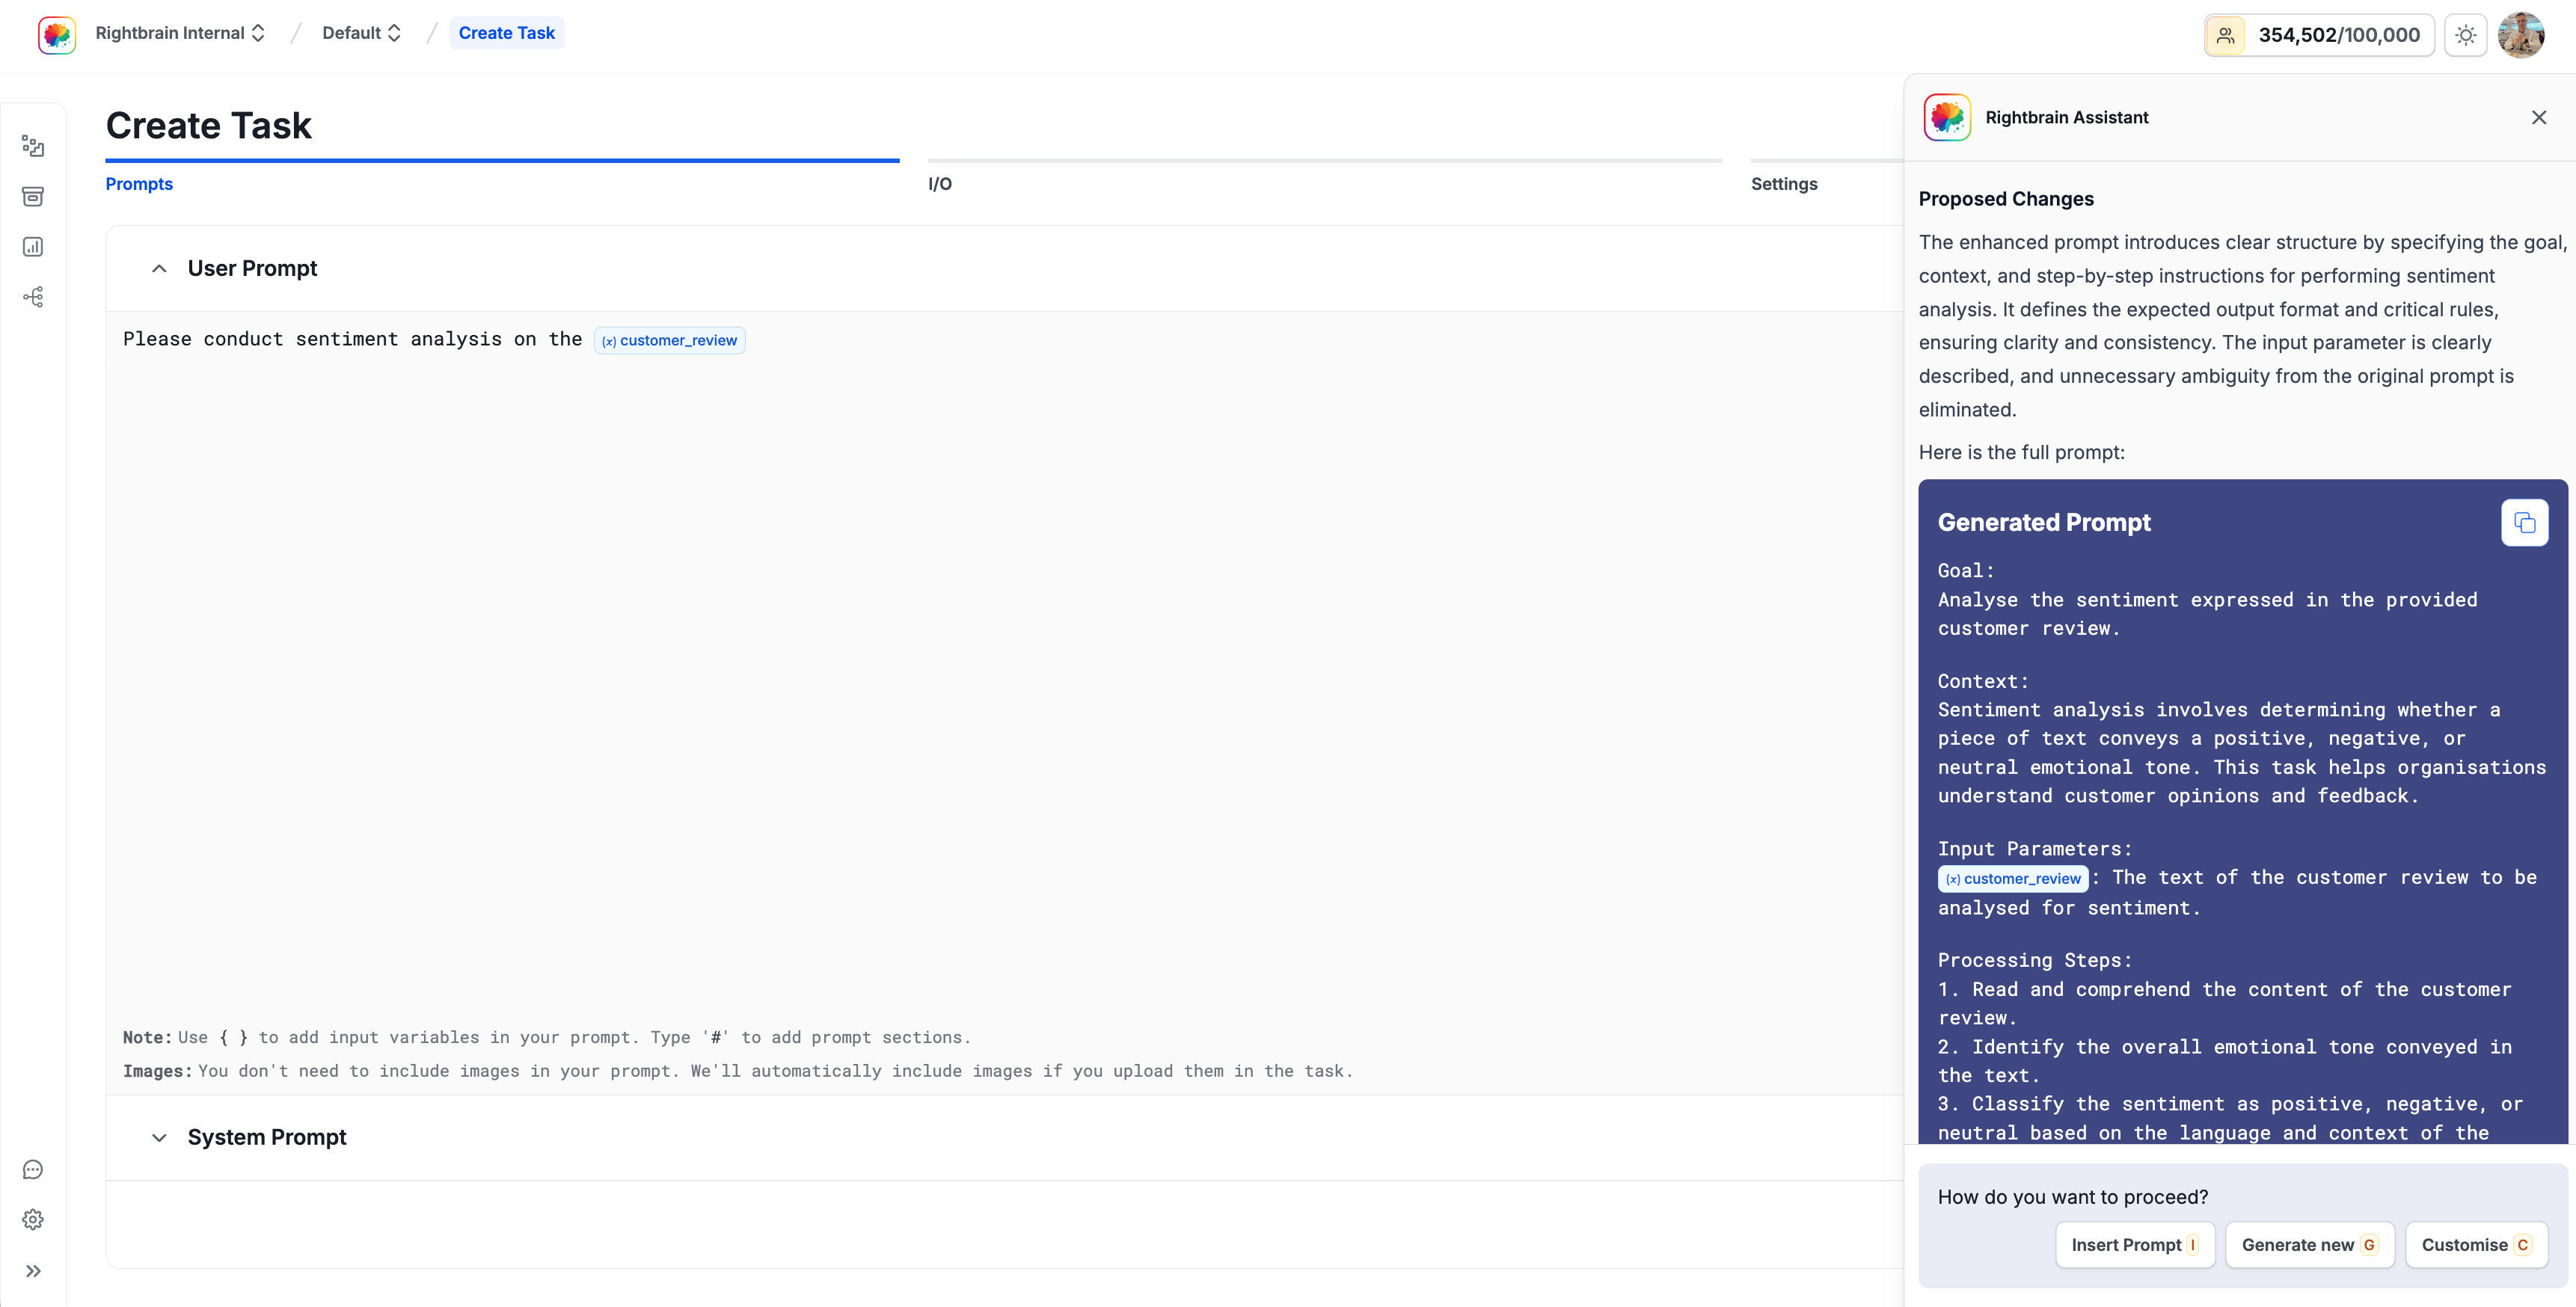
User Prompt
The user prompt is where you tell the AI what to do with the input data.

Start with a simple, focused task description
- Start with a basic instruction like:
"Please conduct sentiment analysis on the {customer_review}" - Variables are automatically detected when you use
{brackets}
The Rightbrain Assistant can enhance your prompt automatically:
- Click when the assistant appears
- Review the improved version
- Choose to “Insert Prompt” or customise further
System Prompt (Auto-generated)
The Rightbrain Assistant automatically creates an appropriate system prompt that:
- Defines the AI’s role and expertise
- Sets additional context for the task
- Ensures consistent behaviour
The system prompt is generated behind the scenes. You can view and edit it by expanding the “System Prompt” section if needed.
Step 2: Configure Input/Output (I/O Tab)
Next up is the I/O tab to define your task’s data structure.
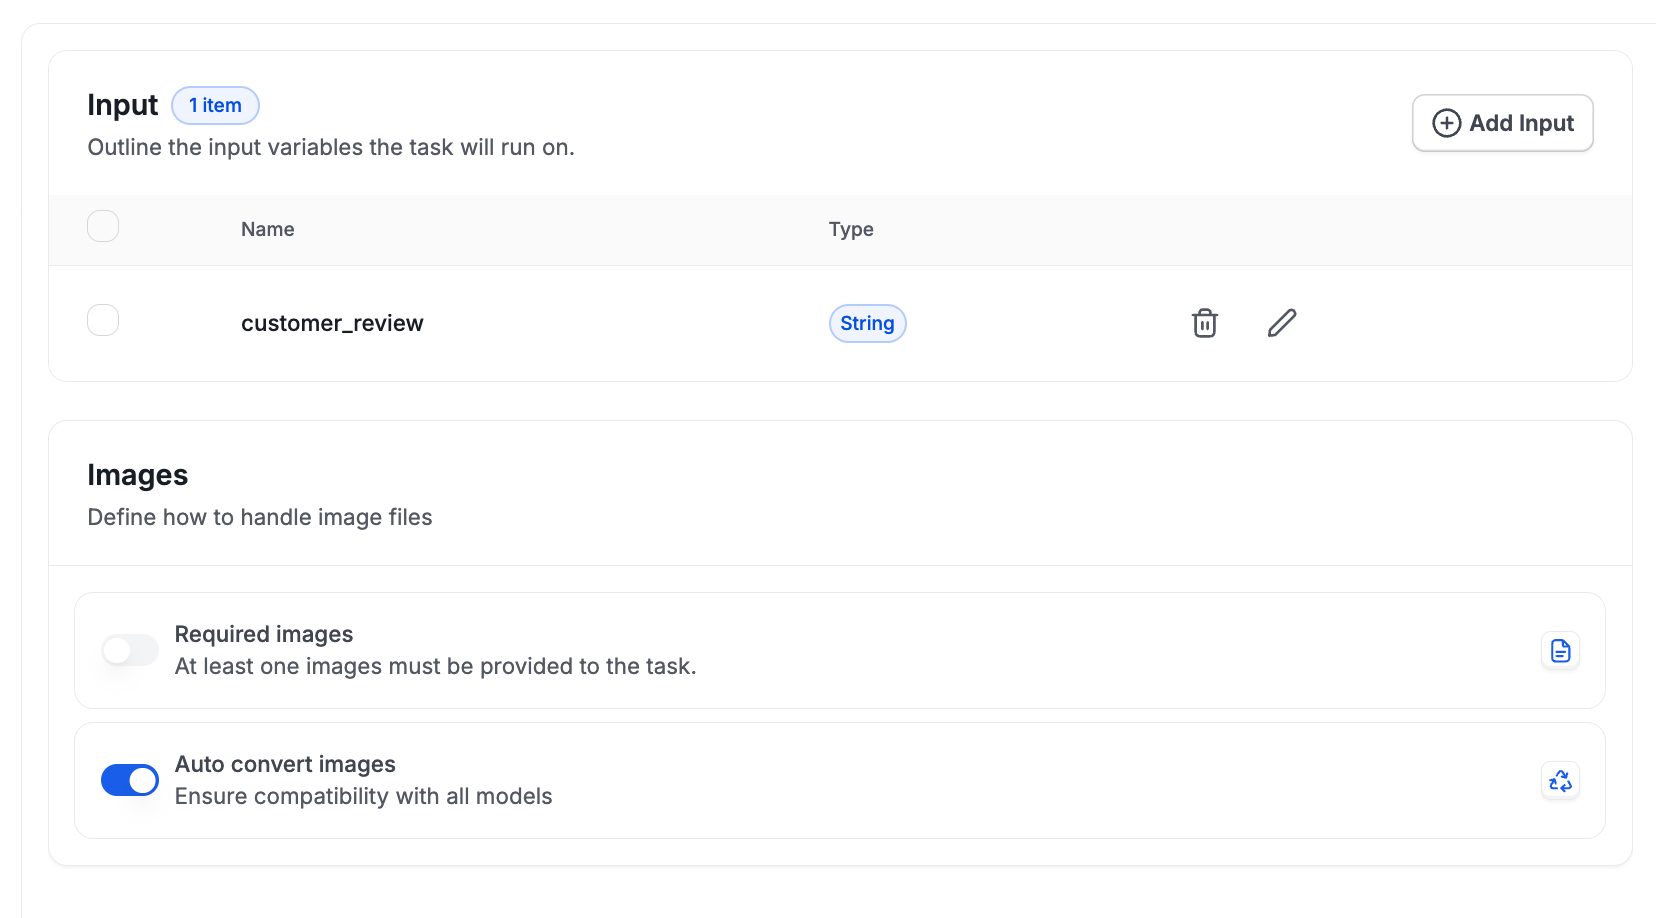
Input Configuration
Your input variables are automatically detected from the prompt:

Variables from your prompt appear here automatically
For {customer_review}:
-
Name: customer_review
-
Type: String (default)
-
Click the pencil icon to edit variable settings
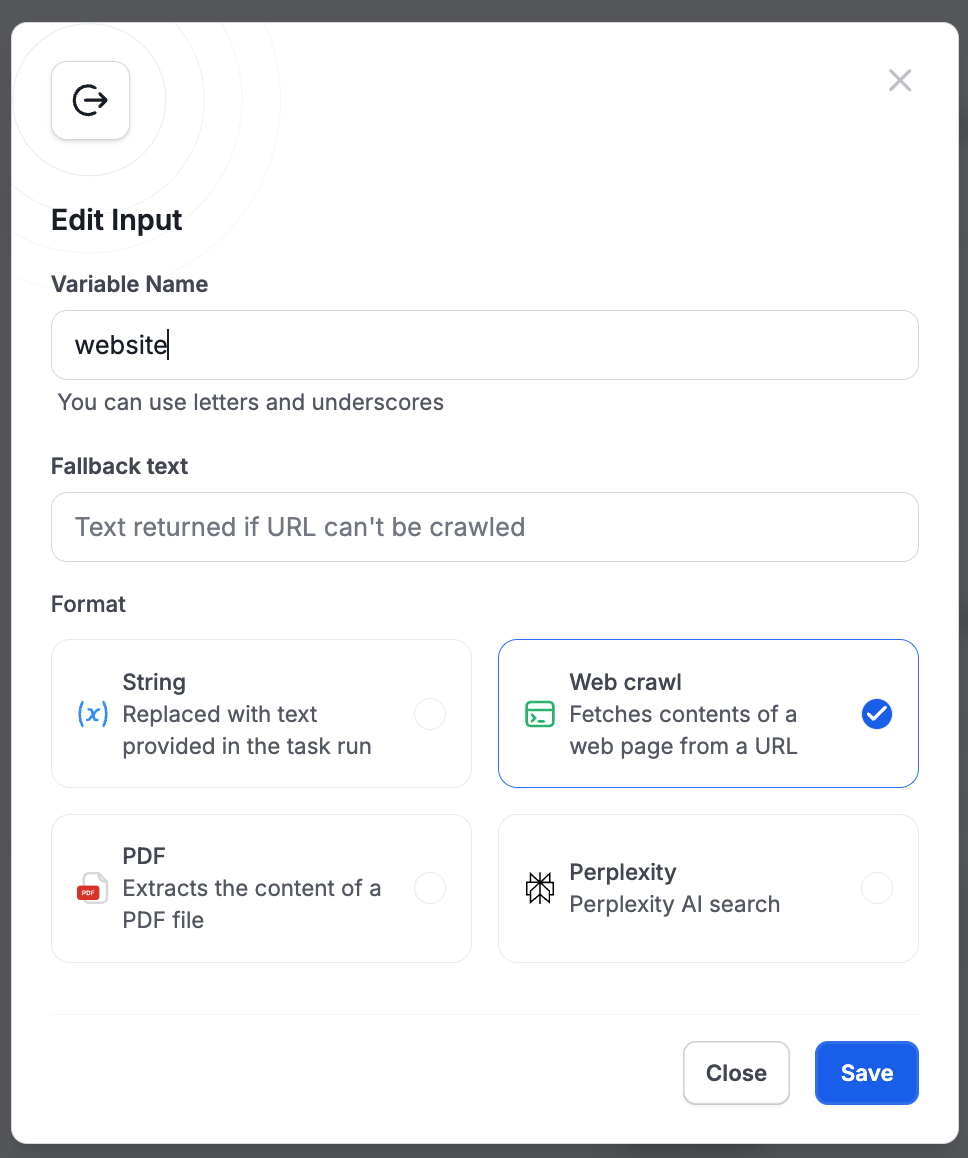
Input Format Options
Click the pencil icon next to any input variable to configure its format:
📝 String (default)
- Text provided directly when running the task
- Use for: reviews, descriptions, questions
🌐 Web Crawl
- Automatically fetches content from a web page URL
- Use for: website analysis, content extraction
📄 PDFs, PPT and CSVs
- Extracts content from uploaded file(s)
- Use for: document analysis, invoice processing
🔎 Perplexity Search
- Performs a live web search and retrieves a set number of top results
- Use for: research tasks, knowledge retrieval, context expansion
To use URL, document or Perplexity search processing, edit your input variable and select the appropriate format option. The system will automatically handle content extraction when the task runs.

Image Handling
Images work differently from other inputs - they don’t require prompt variables:
To accept images in your task:
- Don’t add a variable like
{image}to your prompt - Instead, navigate to the Images section in the Input tab
- Toggle “Required images” if images are required for the Task
- Optionally enable “Auto convert images” for optimisation

Example prompt for image tasks:
Note: No {image} variable needed - the image is automatically included
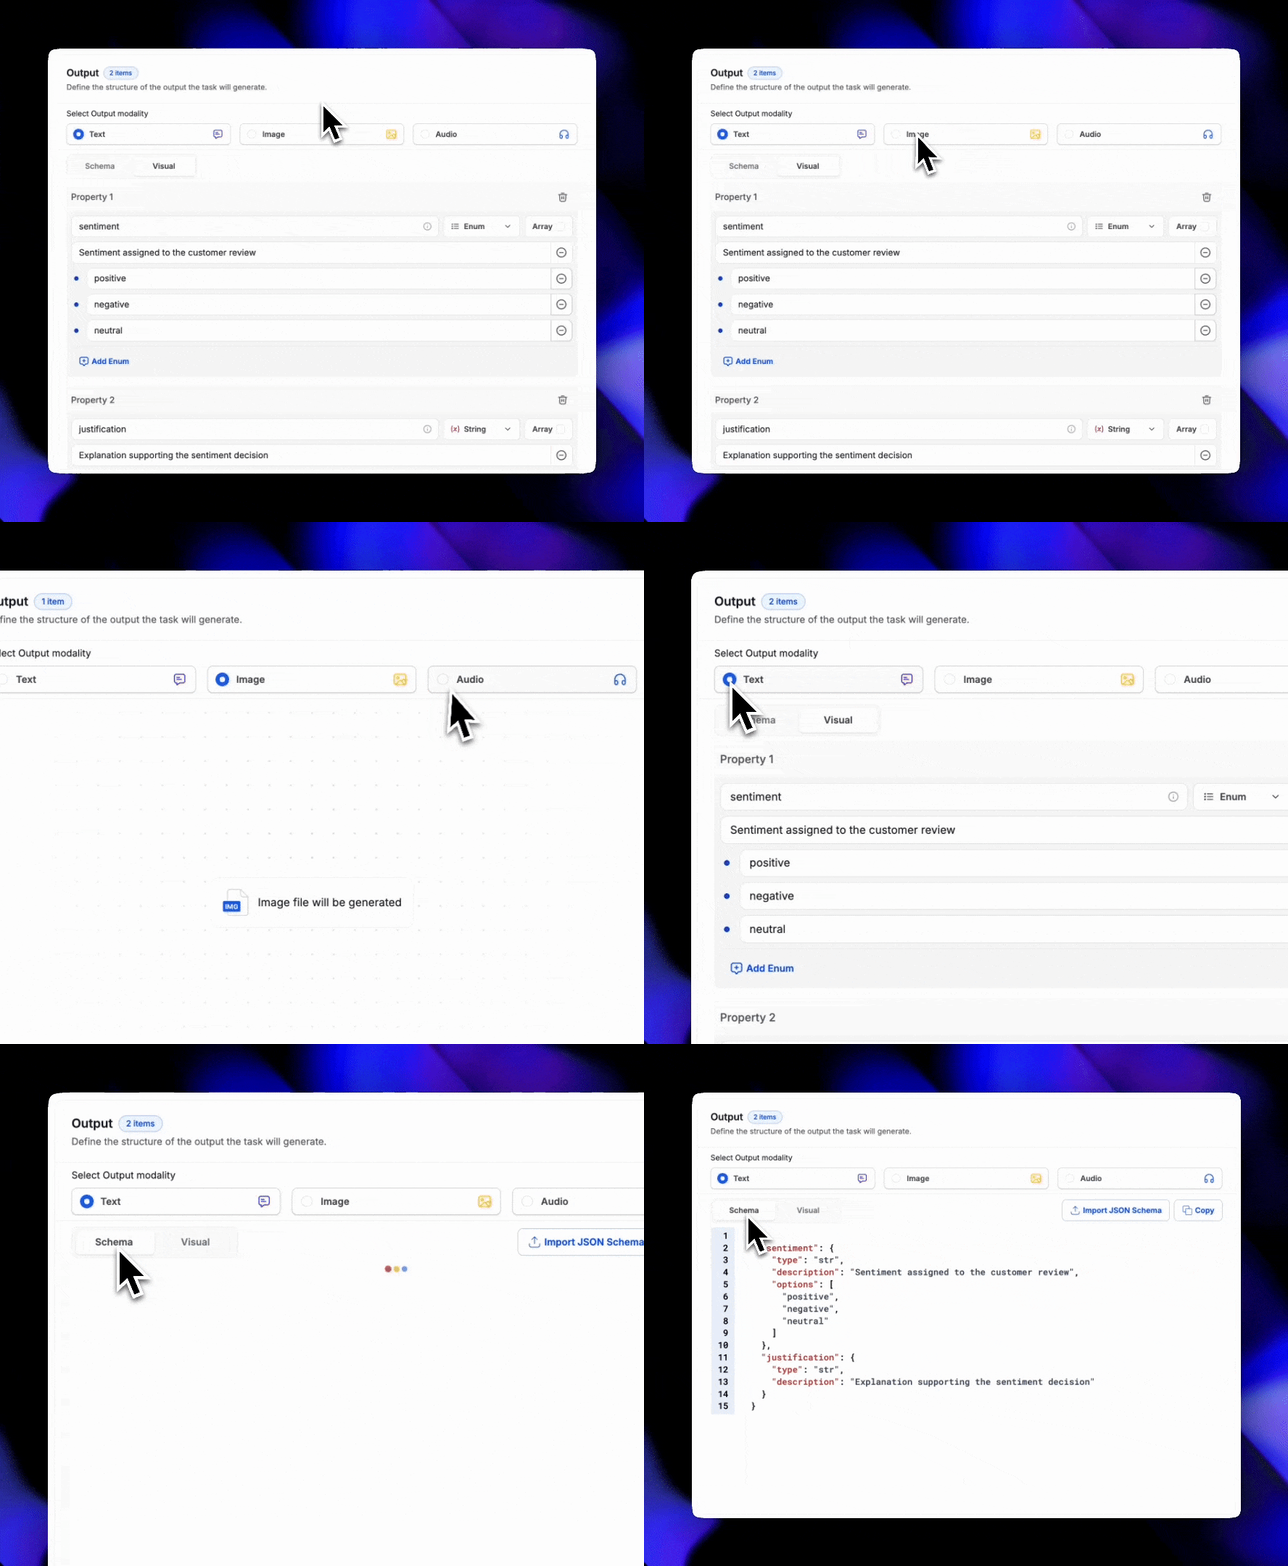
Output Configuration
Define what information the task should return:
Important: Choose your output modality FIRST before adding any properties. This determines whether your task generates text, images, or audio.

- 📝 Text Output
- Default structured data format
- Returns formatted text with defined properties
- Use for: analysis, classification, extraction, and summarisation
- 🖼️ Image Output
- AI-generated visuals created from prompts
- Produces image files directly in your results
- Use for: visualisations, designs, artwork, product photos
- 🎧 Audio Output
- AI-generated audio or speech files
- Converts model output into spoken responses or sounds
- Use for: voice assistants, accessibility, sound generation
For Text Outputs - Define Properties
When using Text output mode, you can define structured data:
Manual Setup
AI Generation
Click “Add Property” to manually define outputs:
- Enter a property name (e.g., “sentiment”)
- Add a description
- Select the type (String, Number, Boolean, etc.)
- Indicate whether the property is an Array
- For options, add the allowed values using “Add Enum”
Schema vs Visual Views:
- Schema: Shows the technical structure
- Visual: Displays a user-friendly preview
For Image and Audio outputs: No additional properties are needed. The task will generate the appropriate file type based on your prompts and inputs.
Output Types Guide
For Text output mode, choose the appropriate type for each field:
Output Types Guide
For Text output mode, choose the appropriate type for each field:
Step 3: Configure Settings
Click the Settings tab to finalise your task configuration.
Task Information
A descriptive name for your task
Auto-generated example: “Sentiment Analyser”
Requirements: Letters, numbers, spaces, and hyphens only
Explain what your task does and when to use it
Auto-generated example: “Analyses customer reviews to determine overall sentiment, providing classification and justification”
Model Selection
Select from available models based on your needs:
- Vision-capable models for image analysis tasks
- Fast models for simple classification
- Advanced models for complex reasoning
Choose a fallback model in case your primary model fails. If a request to your primary model fails 4 times, tasks will be routed to your back up model.
Temperature Setting
Controls response consistency (0-100%):
-
0-30%: Highly consistent (classifications, extractions)
-
30-50%: Balanced (analysis, summaries)
-
50-100%: Creative (content generation, brainstorming)
AI Pre-configuration: The Rightbrain Assistant automatically generates a name and description, and sets optimal values for model and temperature based on your task type. You can always update these during task creation or later.
Using the Rightbrain Assistant
The assistant appears at key moments to help optimise your task:
Prompt Enhancement
When you write a basic prompt, the assistant can:
- Add structured sections (Goal, Context, Input Parameters, Processing Steps)
- Include best practices for prompt engineering
- Clarify instructions and expected outputs
Example Enhancement:
From:
To:
Output Generation
Click “Generate Output” and the assistant will:
- Analyse your prompt to understand the task goal
- Suggest appropriate output fields with types
- Add helpful descriptions for each field
Once configured, click “Create Task” to start testing your task instantly.
